
The usual way to boot a Raspberry Pi involves using a micro SD card with an image of the Operative System that will run on the device. However, since the Raspberry Pi 3, it is possible to boot directly from a USB device, with all the advantages that this entails. You may especially be interested in this functionality if you are the owner of a Raspberry Pi 4, since this model includes USB 3.0 ports, which could provide you with a speed boost over running your OS from a micro SD card.
Raspberry Pi 4
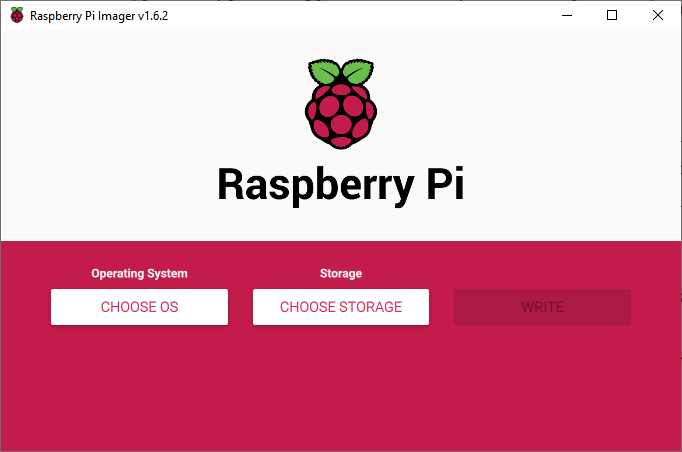
Boot from a USB device is enabled by default in the Raspberry Pi 4, so all you will need is to write the image of your preferred operative system on your USB device, plug it in one of the USB ports of the Raspberry Pi, and reboot. You can also follow these steps:
- Download the Raspberry Pi Imager from the Raspberry Pi website.
- Insert the USB device on your computer and run the Raspberry Pi Imager.
- Click on Choose OS and select the Operative System of your choice.
- Click on Choose Storage and click on the letter assigned to the USB device you plugged in your computer.
- Click on Write and after waiting some minutes, you should be good to go.
After that, all you will need to do is remove the micro SD card from your Raspberry Pi 4, plug in your USB device and power up your Raspberry Pi.
Raspberry Pi 3
Although the process to boot from a USB device in your Raspberry Pi 3 is not as easy as in a Raspberry Pi 4, it is still fairly simple.
For this, in addition to your USB drive, you will need a micro SD card with at least 4 GB of free space with Raspberry Pi OS or Raspberry Pi OS Lite installed. If you have not installed Raspberry Pi OS on your micro SD card, you can do it by following these steps:

- Download the Raspberry Pi Imager from the Raspberry Pi website.
- Insert your micro SD card on your computer through its micro SD card slot or using a micro SD to SD card adapter.
- Click on "Choose OS" and select Raspberry Pi OS if your micro SD card has 4 GB or more of storage, otherwise, click on "Raspberry Pi OS (Other)" and select Raspberry Pi OS Lite.
- Click on "Choose Storage" and click on the letter assigned to your micro SD card.
- Click on "Write" and wait for the process to end.
If you are going to run your Raspberry Pi headless (i.e: Not plugged to any monitor), remember to enable SSH connections and first by creating an empty file with the name "ssh" in your boot partition.
Afterwards, you will need to insert your micro SD card on your Raspberry Pi and power it up.
The next step is to rewrite the OTP (one-time programmable) memory block to allow booting from USB drives. Don’t worry, although this can only be done once, this process will have no negative effects on your Raspberry Pi besides delaying the booting of your OS by a few milliseconds.
To enable booting from USB drives on your Raspberry Pi do the following:
- Power on your Raspberry Pi, attach a keyboard and mouse and plug it to a monitor or connect through SSH (if headless).
- In a terminal, write
echo program_usb_boot_mode=1 | sudo tee -a /boot/config.txt. This will add the lineprogram_usb_boot_mode=1at the end of/boot/config.txt. - Reboot your Raspberry Pi, and run the command
vcgencmd otp_dump | grep 17:
If the result contains the address0x3020000athen the process has been successful.
Make sure to run Raspberry Pi OS or Raspberry Pi OS Lite when doing this process. If you try to use a different operative system, like Ubuntu Server, you won’t be able to modify the OTP.
Now you can write the image of your preferred Operative System on your USB drive using the Raspberry Pi Imager.
Remove the micro SD card from your Raspberry Pi, plug the USB drive, power it up and you will be ready to go!